


How to link MySnoPUD to Energy Star Portfolio Manager
This guide assumes the user has both a MySnoPUD account and an Energy Star Portfolio Manager (ESPM) account with access to the same property(ies). If you need help setting up either of these, please consult the following resources before moving on with this guide:
Step 1: Add MySnoPUD as a contact in ESPM
To add a new contact, follow these steps:
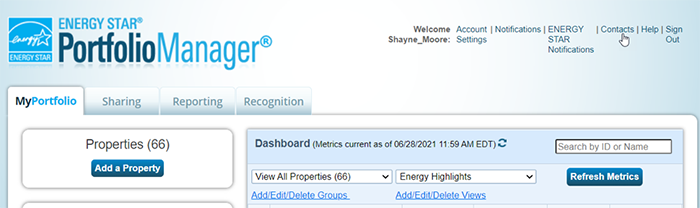
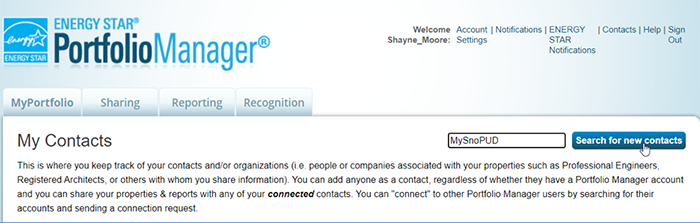
- Log in to your ESPM account. From the Home Screen, click on [Contacts] in the top right corner to navigate to the My Contacts page
- Enter “MySnoPUD” in the search box near the top right of the screen and search for contacts
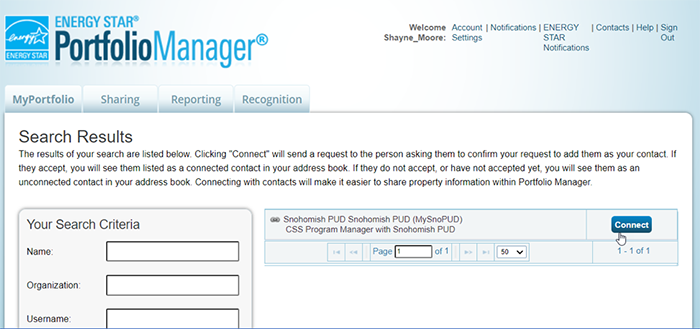
- From the Search Results page, find the MySnoPUD contact, and click [Connect]. Follow the on-screen prompts to complete sending the connection request.Please note: the connection request will be accepted automatically and will take up to 24 hours to complete
Step 2: Setting up data sharing with MySnoPUD in ESPM
Once connected to the MySnoPUD ESPM account, follow these steps to set up the data sharing permissions.
- From the ESPM home screen, click on the Sharing tab and select the [Share with your Utility or Service Provider…] button

- From the Share (or edit Access to) Properties screen, follow the on-screen prompts to fill out the following sections:
- Select Web Services Provider (Account): Ensure ‘MySnoPUD Web Services’ is the selected option
- Select Properties: Click the button and follow the prompts on the overlay.
- Choose Permissions: Select ‘Bulk Sharing (Simple Option)’ and either the ‘Exchange Data Full Access’, or the ‘Exchange Data Custom Access’ sub options:
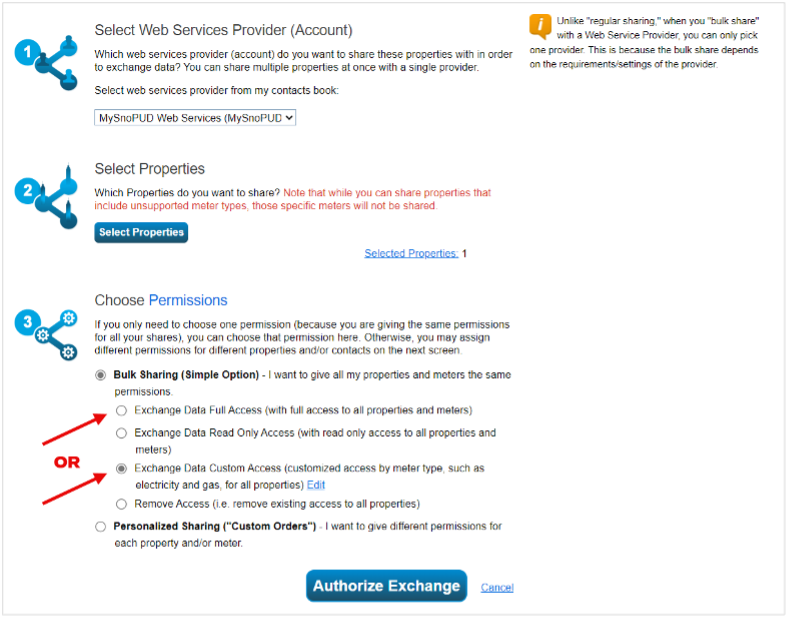
- When choosing the ‘Exchange Data Custom Access’ sub option, please ensure that at a minimum ‘Exchange Data Full Access’ is granted to Electric Energy meters:

- Click ‘Authorize Exchange’
- Once the Exchange has been authorized, you will be navigated back to the main Sharing tab and you should see a green message box near the top of the page.

Step 3: Establish the connection to ESPM in MySnoPUD
-
-
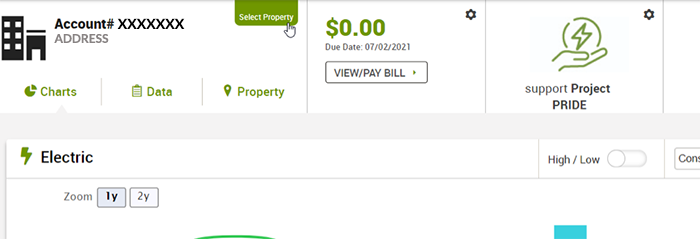
- Log in to your MySnoPUD Account. If you have access to more than one property you can search for the property(ies) that needs to be shared with ESPM using the [Select Property] pull down menu in the top left of the page.
 If a property has more than (1) meter under different account numbers, you can use the Meter Grouping functionality to simplify the data upload process. Select [Add New +] at the bottom of the [Select Property] Menu. The following overlay will allow you to select multiple meters, as well as assign a unique name.
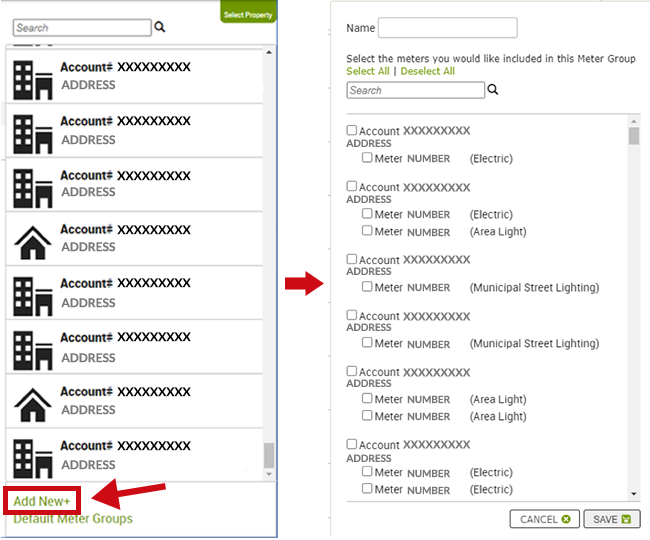

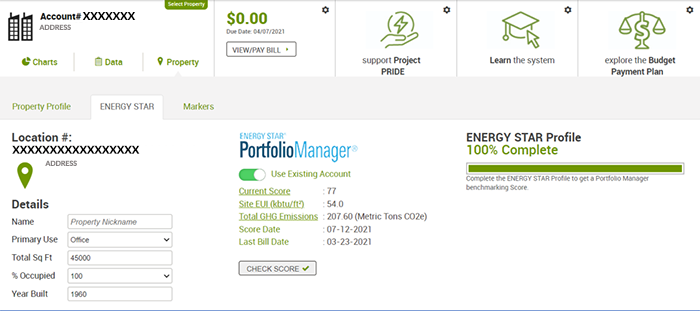
- Once the appropriate meter (or meter group) has been selected, click on the Property tab, and then select the Energy Star sub tab
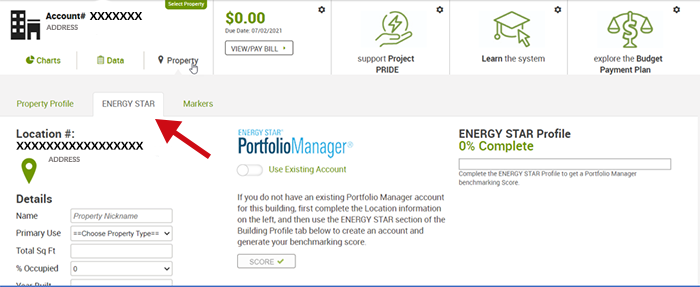
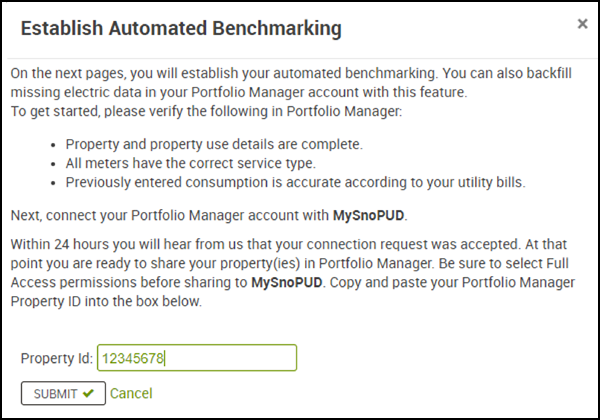
- Click the [Use Existing Account] slider button in the middle of the page to open the Establish Automated Benchmarking overlay. Enter your property’s Portfolio Manager Property ID (available on the ESPM MyPortfolio Tab, under the property’s name) and click [Submit].If your property is not found, double check the property ID and that you have shared access to the property with MySnoPUD in ESPM.
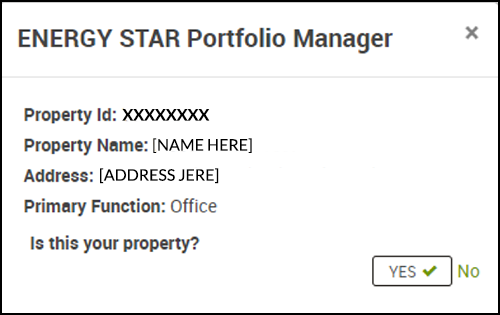
- Once your property is found, a separate Energy Star Portfolio Manager confirmation overlay with the property’s ID, Name, Address, and end use information will display. Click [Yes] to confirm and follow the remaining on-screen prompts to complete the connection process.
- Once submitted, data transfer can take up to 10 minutes. Once begun, the screen should not be refreshed or closed, even if it appears frozen.When complete, log on to ESPM to verify the transfer was successful. After the initial data transfer, future utility data will be pushed automatically.If you receive an error during this process, log on to ESPM to verify if data was transferred successfully before trying to re-initiate the process.
- Log in to your MySnoPUD Account. If you have access to more than one property you can search for the property(ies) that needs to be shared with ESPM using the [Select Property] pull down menu in the top left of the page.
-
Step 4: Finishing touches in ESPM
If your property already contains existing utility data, it will be important to verify existing meters do not overlap with the automatic data upload to avoid double counting.
To set the individual meter deactivation dates, for each individual meter:
-
- From your building’s Property page, navigate to the Energy tab
- Click on the meter you would like to deactivate – this takes you to the Basic Meter Information page
- Expand the Basic Meter Information page by click on the title bar
- Uncheck the “Still in Use” Box found underneath the “Date Meter became active”
- Enter the start date noted from the MySnoPUD step above